Launching the Installation of Windows 7
when you get your hands on your new copy of Window 7 you’ll want to get it up
and running as quickly as possible. The installation process follows similar
lines to Windows. Vista , so if you’re upgrading
form the previous version of the operating system you should be able to do so
while keeping your applications and files intact. However, Microsoft recommends
that you take the opportunity to do a complete reinstall of Windows, erasing
everything on your hard drive before putting Windows 7 in place while this is
more complicated and will take longer to complete, it will enable you to get
rid of any system problems, conflicts and redundant data that has built up in
the pas. Essentially, you’ll given in mind the improvements, that have been
made wit the latest operating system, you might consider this worth the time
and effort.
Installation Options
If you do deiced to opt for a clean, install and you’re
using your existing hard disk drive rather than new one; you’ll need to ensure
that you’ve backed up all of your programs, files, and setting first. Once
Windows 7 is in place, you’ll need to reinstall all of your software, so make
sure you still have the original product discs and serial codes to hand. Note
that if you’re running XP, you’; have to do a clean install of Windows 7
though you will be able to pick up the software at an upgrade price, you’ll
have to wipe your existing operating system and start again form scratch.
If you have several hard drives or partitions set up on your
PC, then you have the option of running a dual-root system, where a boot up
menu gives you the choice of launching either Windows 7 or your older operating
system.
Step 1
If you’re running the installation form within an existing
version of Windows, you’ll see a screen like this when your load the Windows 7
DVD. You can follow the top link to check that your system has the hardware to
cope with the new operating system, or click Install now to start setting it
up.

Step 2
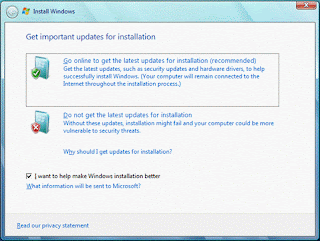
Before Windows begins to copy files over to your hard drive,
you’ll be asked if you want to check online for the latest updates and patches
that may have been released since the launch of Windows 7. We’d recommend that
you do this to make sure you’re not missing out on any important upgrades.
Step 3
As with previous versions of Windows, you’ll be able to
install Windows 7 on top of an earlier version of the operating system, or use
a fresh hard disk drive of r the software. Choosing the first option will retain
your files and applications, thought we’d always recommend making a backup
first.
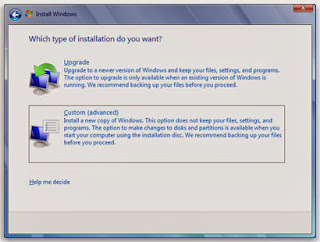
Step 4
If you choose a Custom (advanced) installation, then you’ll
be able to specify the disk or partition on which you’d like to install Window
7. If you want to create a dual-boot system on a single hard drive, you’ll need
to take advantage of a partitioning tool to split the drive up in to chunks of
space.

Creating a Dual-boot system
If you have a spare drive or partition on your home computer,
and it has enough space, you can install Windows 7 to this rather than over
writing the operating that you currently have in place. The obvious advantage
is that you can leave all of your existing applications and files in place
while having the option to use Window 7 as well – however, you’ll still need to
install any software you need and copy any data onto the second drive or
partition as well as the first. Unless you have a very good reason for doing
so, we’d recommend starting afresh with Windows 7 – remember that it’s
compatible with the vast majority of older Windows software, and you won’t have
to duplicate files across different disks and partitions, saving you precious
hard disk space.
A clean install is also much faster to do than an upgrade,
though you need to factor in the time taken to back up all of your media files
and data first. If you do decide to opt for a dual-root system, you must make
sure that the older operating system makes sure that the older operating system
is installed first; otherwise you might not be able to get into Windows 7
website at www.microsoft.com.
Backing Up Programs and Files
Whether you’re running an upgrade from Vista to Windows 7
or trying a fresh install, we’d recommend backing up all of your important data
and setting first. Check the documentation that comes with your key programs
for details of how to do this – most web browsers can easily export a list of
bookmarks ready to import again t a later stage, for example. Buying an
inexpensive external USB hard drive is the easiest way of creating a temporary
backup of your data. Photos, music and video can all be copied over to this
drive, and then transferred back when Windows 7 is in place you can either copy
the files over manually, or make use of the backup tools built into Windows.
You should already have a backup procedure in place, and if this is the case
you can run this before installing Windows 7 . If you use an online storage
solution, for example, then you can download all the files you need from the
web (though this may take some time to compete of you have several hundred of
gigabytes to work through). Ultimately,
make absolutely sure you have copies of the files you can’t afford to lose
before you get started with a Windows 7 installation.
As we have already mentioned, you’ll find plenty of advice on
the official Microsoft website, so if there’s anything you’re unsure of then
this is a good place to start. There are also a host of other online resources
that you can turn to – the forums at www.sevenforums.com
in clued a range of helpful tutorials and guide as well as pointers and tips
form other Windows 7 users.
