Showing posts with label Computer Tips/Tricks. Show all posts

Common Computer Speed Tips which don’t work at all


Common Computer Speed Tips which don’t work at all
www.techpopups.blogspot.com


Friends as everyone knows this is an era of speedy and fast. Everyone wants to accomplish his task within the click of his finger. If in this fast running era your computer works slowly then it means you are off the race. On internet you will find scores of tips to boast the performance of your computer. But there are several tips which don’t work as a matter of truth. For that very reason there’s no any benefit of applying such tips.  So friends I would like to introduce you mainstream tips which don’t affect on the speed of your computer at all:

SSD Optimization


Friends the first tip of embarking your computer performance is defraging SSD. Typically you may be suggested by your friends this tip, but as matter of fact this tip doesn't work at all. By defraging SSD again and again its life reduces. Some defragement software also feature to optimize SSD to enhance card speed, but friends believe me this is not true. Having applied this tip you might feel a little improvement in your computer speed, but this is only for the time being. So I will suggest you that you don’t go for this tip as it will affect on your computer device.

Do empty folder & increase your computer speed


You will see several tips about making empty some folders of Windows and it will increase your computer speed. For instance, folder “Prefetch” that keeps the details of programs and Windows in it. Make sure by deleting these details will not get you speed in your computer. Actually this folder erases the data automatically after 130 entries. Friends if you manually delete the data of this folder then your computer will take long to boot.

Deleting Windows registry


I have seen many programs claiming that our program deletes registry data and gives you good speed of your compute. I am agreed that registry editor consists on unnecessary entries of Windows and programs. Whenever you uninstall any program from your computer, its information and other details remain in registry editor. Deleting all this data can only increase the space, but not speed. This tip can work at that time when your system is about 10 years old and there is a massive data available in your registry editor due to installing and uninstalling many programs in this period.

Defragement Android Devices


There are many applications available  on play store which you will see claiming about increasing speed by defraging memory. In android device sold state memory is used that’s why there is not any difference in computer speed by defraging SSD. All such sort of apps are useless because they don’t speed up your device after applying them.

Killing Application Process


You can only give relax to your device resources for the time being by killing the process of the application, but after a while this app turns on again. These all above tips don’t work for increasing computer speed. Hopefully I will share with you useful tips to increase computer speed in my next post .


Thank you friends and hope you liked my post. Please share your feeling or opinion about post writing in the comment box.

How to take back up of Chrome Bookmarks


Friends I believe everyone knows the importance of bookmarks. We don’t have to write or remember the website address again & again if we bookmark all usable addresses.

But it is common when we reinstall the Windows, all applications and browsers history and bookmarks vanish. So I would like to suggest you guys to take back up of your all bookmarks first and then reinstall the Windows.

Here are the simple steps to so do:


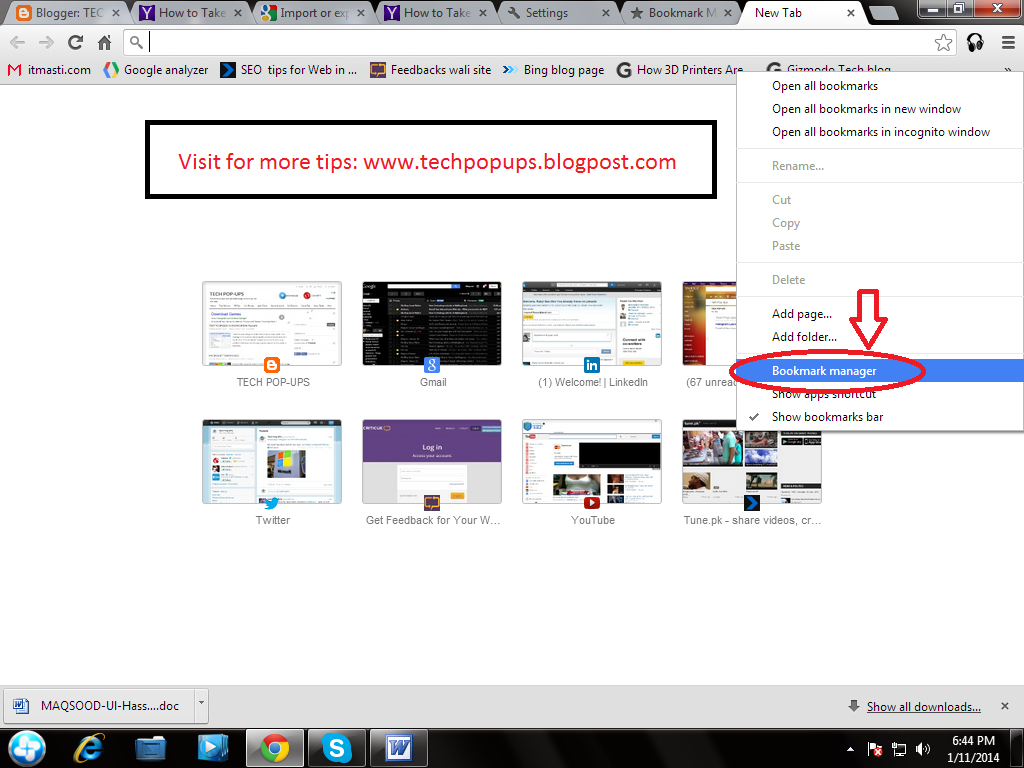
STEP 1


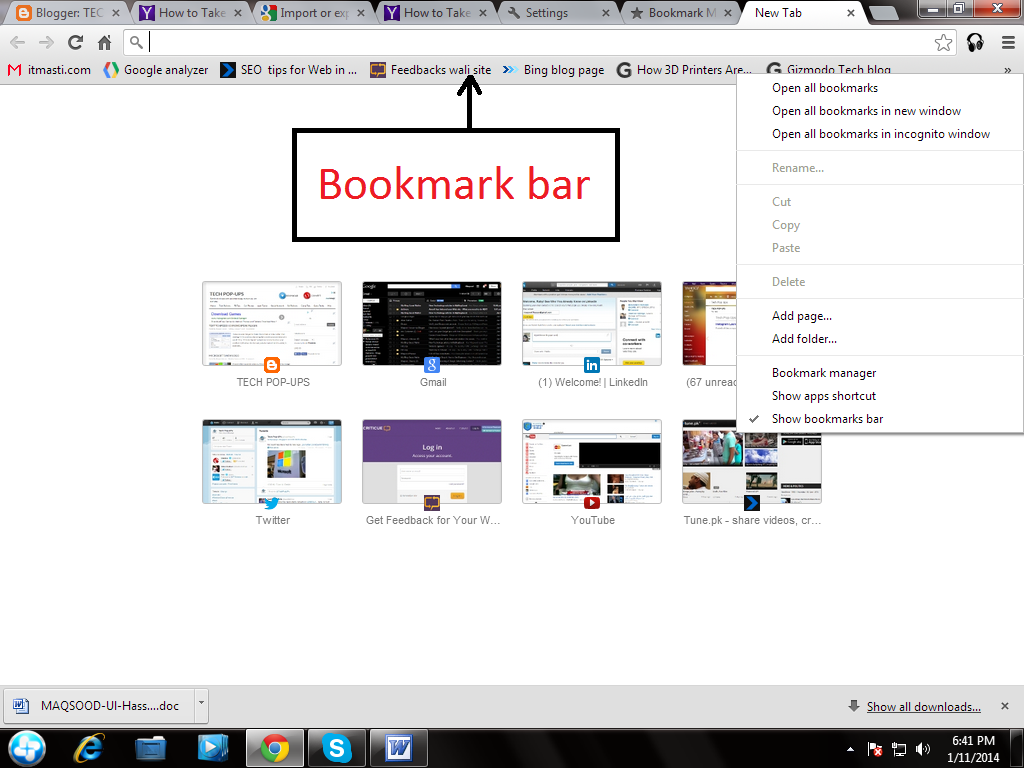
Open Chrome browser and right click on the bookmark bar, normally docked underneath the address bar.


How to take back up of Chrome Bookmarks

STEP 2


Now choose “Book Mark Manager” from the drop down list:


How to take back up of Chrome Bookmarks

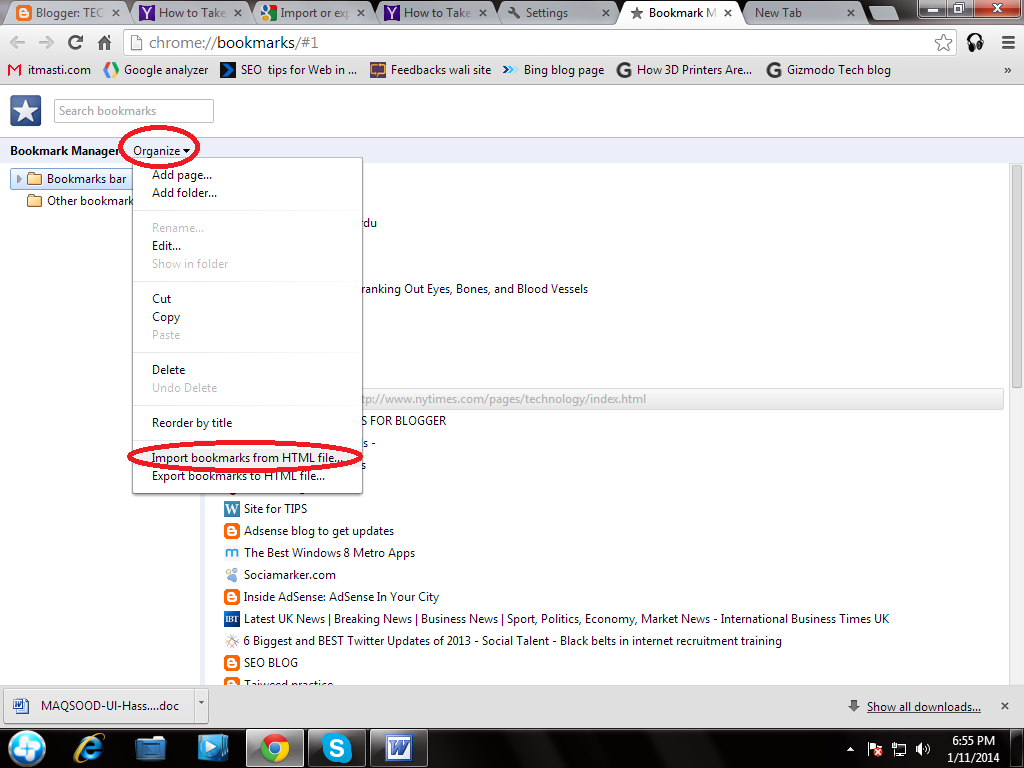
STEP 3


Now you can see all your bookmarks in front of you. Click on “Organize” and select “Export Bookmarks from HTML file”


How to take back up of Chrome Bookmarks


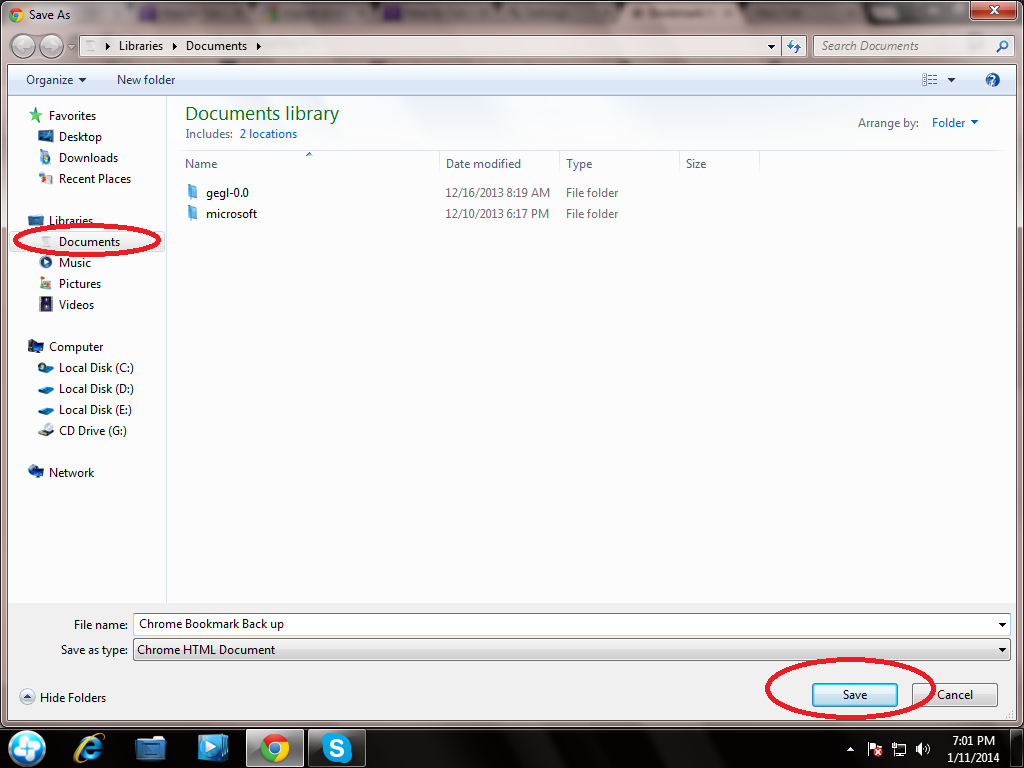
STEP 4


Now here give your desired location and click on save button.


How to take back up of Chrome Bookmarks


Friends now you are done!


Chrome will export your bookmarks as a HTML file, which you can then import into another browser.

WORD USEFUL SHORTCUT KEYS


WORD USEFUL SHORTCUT KEYS
http://www.techpopups.blogspot.com/


The followings are shortcut keys and mouse shortcuts that can be used for Microsoft Word


Mouse shortcuts


ShortcutDescription
Double-click (on a word)Select the word.
Single-click (anywhere in a sentence) + Holding CTRLSelect the entire sentence.
Triple-click (anywhere in a paragraph)Select the entire paragraph.
Click, hold, drag, then releaseSelect text from the click position to release position.
Click first position, hold SHIFT key, then click 2nd positionSelect text from the 1st position to the 2nd position.
Hold ALT key, then click and dragVertical select text.
Hold CTRL key, then scroll wheelZoom in/out.


Keyboard shortcuts


ShortcutDescription
Ctrl + ASelect all (including text, graphics).
Ctrl + BBold.
Ctrl + IItalic.
Ctrl + UUnderline.
Ctrl + CCopy.
Ctrl + VPaste.
Ctrl + XCut.
Ctrl + FFind.
Ctrl + ZUndo.
Ctrl + YRedo.
Ctrl + POpen the print dialog.
Ctrl + KInsert link.
Ctrl + LLeft align.
Ctrl + ECenter align.
Ctrl + RRight align.
Ctrl + MIndent.
Ctrl + (left arrow)Moves one word to the left.
Ctrl + (right arrow)Moves one word to the right.
Ctrl + (up arrow)Moves cursor to the beginning of the paragraph.
Ctrl + (down arrow)Moves cursor to the end of the paragraph.
Ctrl + Shift + FChange font.
Ctrl + Shift + *View/hide non-printing characters.
Ctrl + DelDeletes word to the right of cursor.
Ctrl + BackspaceDeletes word to the left of cursor.
Ctrl + EndMoves cursor to the end of document.
Ctrl + HomeMoves cursor to the beginning of document.
Ctrl + SpacebarReset highlighted text to the default font.
Ctrl + 1Single-space.
Ctrl + 2Double-space.
Ctrl + 51.5-line.
Ctrl + Alt + 1Format text: heading 1.
Ctrl + Alt + 2Format text: heading 2.
Ctrl + Alt + 3Format text: heading 3.
F1Help.
F4Repeat the last action
F5Go to .
F7Spelling and grammar.
F12Save as.
F8 then (left arrow)Increase selection to the left by one character
F8 then (right arrow)Increase selection to the right by one character
Ctrl + F1Task Pane.
Ctrl + F2Print preview.
Alt + Ctrl + F2New document.
Shift + F3Cycle between capitalized formats
Ctrl + InsertCopy.
Shift + InsertPaste.
Shift + EndSelect from current position to the end of the line.
Shift + HomeSelect from current position to the beginning of the line.
Ctrl + Shift + (left arrow)Select from current position to the beginning of the word.
Ctrl + Shift + (right arrow)Select from current position to the end of the word.
Ctrl + Shift + (up arrow)Select from current position to the beginning of the document.
Ctrl + Shift + (down arrow)Select from current position to the end of the document.
Ctrl + Shift + Page UpSelect from current position to the beginning of the window.
Ctrl + Shift + Page DownSelect from current position to the end of the window.
Shift + Page UpOne screen page up.
Shift + Page DownOne screen page down.
Shift + F7Thesaurus check selected text.
Shift + F12Save.
Ctrl + Shift + F12Print.
Alt + Shift + DInsert the current date.
Alt + Shift + TInsert the current time.

Password protect a folder


Password protect a folder


There are quite few ways to password protect folders in Windows, but most of them rely on pricey third-party software. Below, I have would like to share s way to password-protect a folder; one without using any external software and the other using a free third-party software.

STEP 1


Create a new folder and name it (I'll use the name Private).

Password protect a folder


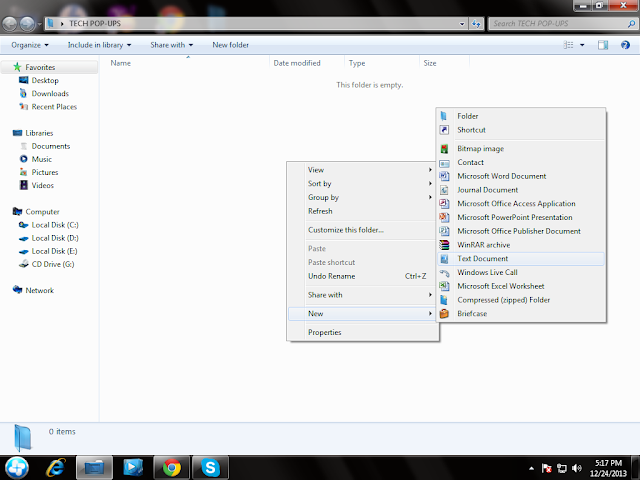
STEP 2


 Now open the folder and right click. Go to "New" and select "Text Document". See screen shot below:

Password protect a folder


STEP 3


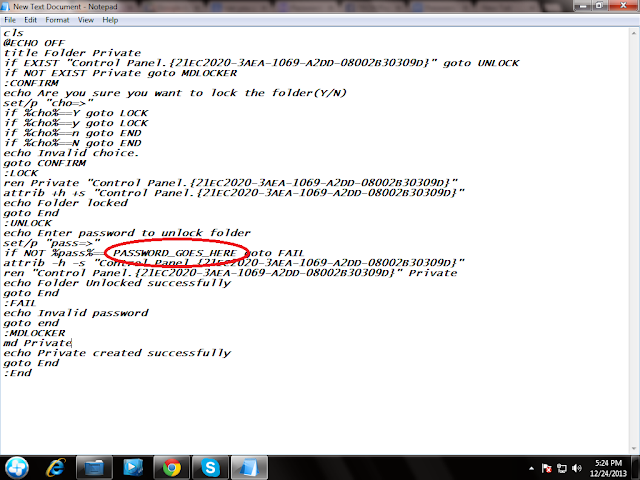
Head over to the link : "www.tinyurl.com/opqcwej"

On this site you will see a code, copy it and paste in the opened text document.

Password protect a folder


STEP 4


Don't close the document. Find "PASSWORD_GOES_HERE" in the code you pasted and  replace it with the password you want.
Now it should look like "if NOT %pass%==techpopups" goto FAIL.

Password protect a folder


STEP 5


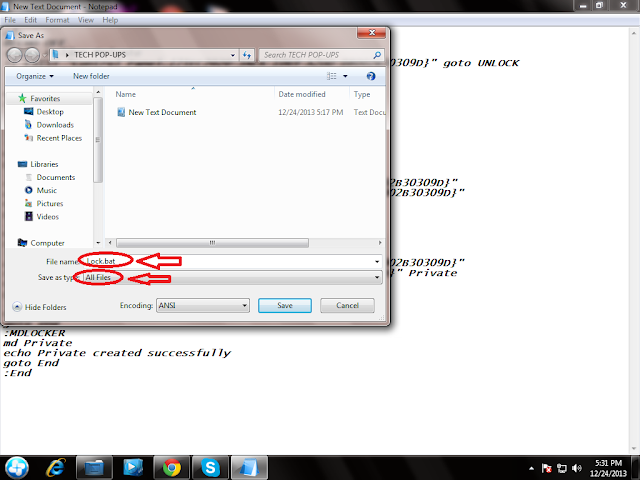
Go to "Save as" by clicking the "File" option in the Tittle Bar.


STEP 6


Change the File type from "Text Document.txt" to "All Files" and change the name of text document to "Locker.bat". Now save the file.

Password protect a folder


STEP 7 


Go inside the folder that was created in the first step, open "Locker.bat". A new folder called "Private" will now start showing up.


STEP 8


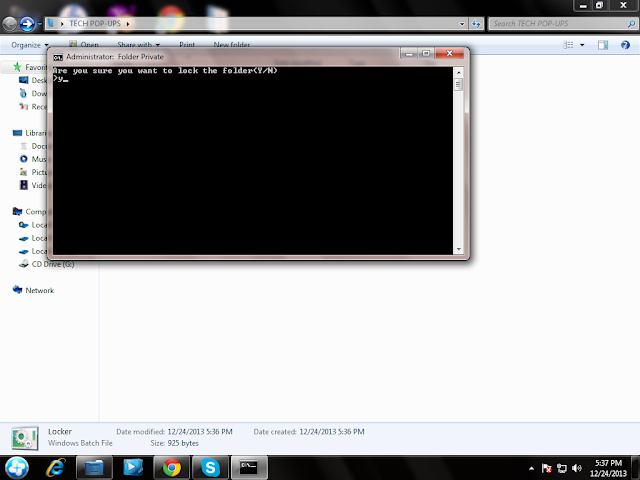
To lock the "Private" folder, double click "Locker.bat" and write "Y" and hit enter.

Password protect a folder


STEP 9 


To unlock it, double click "Locker.bat" and enter the previously-specified password.


Password protect a folder


Through this method, your private folder will only be visible when you launch Locker,. bat and enter the correct password. We would suggest creating this folder in a less obvious location.
And don't worry, the text document  (in which you entered the password) that resides besides the Locker.bat file will appear to be empty if opened later on (by you or some other nosy person!)

LibreOffice 4.1

TECH POP-UPS


While the once popular OpenOffice has languished for the past couple of years, the LibreOffice suite that spun off in 2011 has been steadily improving - although with a combination of under -the-hood bug fixes, improved compatibility with Microsoft Office documents and incremental features rather than any really big developments.

LibreOffice 4.1 continues this trend, with useful new features but no major changes. Like OpenOffice, LibreOffice is free and includes the same programs: Writer, Calc, impress for presentations, the Base database, Draw and the math formula editor. Unlike the single installer for OpenOffice or Microsoft Office 2013, the download is in two separate files that have to be transferred in order if you want the built-in help. That makes it a slightly less polished installation  process than for OpenOffice, but The Document Foundation has digitally signed the files so that, unlike with OpenOffice, it doesn't trigger security warnings on Windows and Mac OS.

Another oddity is that the Windows release is a generic 'international build'. The English Version installs not only th UK and US interface languages, but also the South African Variant, plus French and Spanish dictionaries (you can save space by removing them during installation). You may also want to skip the QuickStart component which pre-loads much of OpenOffice as soon as Windows starts; even though it's installed by default, it;s not enabled unless you choose to turn it on.


TECH POP-UPS
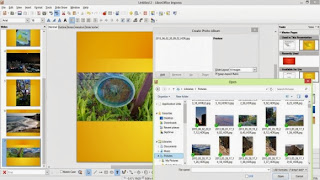
Select multiple images to show on the pages of your presentation

When you have installed OpenOffice 4.1 it looks very much like OpenOffice 4.0 with different icons. It also has broadly the same features, with some extras. The interface is firmly in the menus and toolbars era, although the toolbar icons in OpenOffice are larger and slightly easier to make out than in OpenOffice, many dialogue boxes are also larger with better layouts, except for the Find & Replace dialogue, which looks cramped compared to the OpenOffice writer Find & Replace. However, if you just want to find a word you can use the search bar that opens at the bottom of your document in all the OpenOffice applications. Also , you can now choose whether you only want to find words with the right case (Office rather than office, for example).

OpenOffice 4.1 offers similar links to templates and extensions in its start page as OpenOffice 4.0, and they're equally confusing for inexperienced users. The site concentrates on telling you how to upload templates rather than how to find and download  them, and the template section isn't as well designed as the OpenOffice site. Once of new features - the sidebar - may look familiar from older versions of Microsoft or OpenOffice 4.0. It reflects the fact that the Document Foundation that maintains LibreOffice is able to incorporate code from OpenOffice to fix bugs, remove unused features or improve performance.

The sidebar is marked as an 'experimental' feature that you have to enable in the advanced options. If you don't, you'll still see a side bar that works slightly differently from OpenOffice: instead of an obscure list of icons, it shows all the available panes in collapsible sections. In this mode the Gallery is a large pane at the top of the window and the Navigator, Styles and Formatting open as panes you can move around or dock at the side of the screen, where they sit on top of the sidebar rather than opening inside it. This leaves you with small panes that don't show very much.


TECH POP-UPS


If you enable the sidebar it becomes full height, as in OpenOffice, and you get the same obscure list of icons, but it still doesn't expose all the properties you can get by right-clicking on an object. The new clip art in the Gallery that comes from OpenOffice is probably more useful. Similarly, LibreOffice takes advantages of the Office file format compatibility still isn't the same in the two suites - or perfect, especially on longer, more complex Office documents with intricate page layouts. In one of our test documents, neither program got page layouts quite right, with images aligned incorrectly or placed on the wrong side of the page.

OpenOffice Writer did slightly better than LibreOffice Writer, but only LibreOffice Writer can open ink writing with a stylus in Microsoft Word - although even then it doesn't render the ink as smooth lines. One big advantages over OpenOffice 4.0 is that when you save a file in LibreOffice 4.1 you can choose the XML Office formats as well as the older binary versions and the ODF formats. That makes it more likely that you'll find a format you can share with people.

If you're switching from very old versions of Office, BlibreOffice 4.1 no longer exports to version 6 word and Excel file formats. That's good for security as these older binary formats can carry viruses and do not support newer features. And if you have documents in elderly Mac word processing formats, like Microsoft Word for Mac 5.1, you can now open those in Writer, although LibreOffice no longer runs on Power PC Macs.


TECH POP-UPS
LibreOffice didn't get the pagination or layout of this complex Word document right; OpenOffice did only slightly better

In addition, if you're moving documents between machines or sharing with people who work elsewhere, you can now embed fonts in LibreOffice documents when you save them. Performance is generally slightly better in LibreOffice 4.1 also has some useful new features of its own. If you want to turn a set of images into an Impress presentation, you can insert them as a 'photo album'. You have to select images one at a time in the dialog box and you don't get a preview, but you can choose as them placed one, two or four to a slide.

It's a shame Impress doesn't also get Writer's new option to rotate images by right-clicking. You can only choose to rotate 90 degrees clockwise or counter-clockwise, but it's much faster than having to right-click on the image in Impress and delve into a dialogue box. Also, LibreOffice 4.1 has not matched all the improvements seen in OpenOffice 4.0. For example, it gets the new selection of color gradients, but still has the old rather random color palette rather than the more logical new layout. Inconsistencies like this are down to the different teams working on the two projects, and they're frustrating for the user.

Neither LibrOffice nor OpenOffice matches Microsoft Office 2013 for features, but if you don't want to pay for Office or you just can't get used to the ribbon interface (even tough you can customize it now), which of the two free suites should you pick?


TECH POP-UPS

VERDICT


LibreOffice 4.1 is, as the numbering suggests, a point release. Certainly it's not as big an update from LibreOffice 4.0 as OpenOffice 4.0 is from its predecessor. But then LibreOffice 4.0 had already improved on both OpenOffice and its own initial release, adding features such as better support for importing PivotTables and more master pages in Impress. LibreOffice 4.1 also has several new features that put it ahead of OpenOffice 4.0, while lacking only minor features like the new color palette. Add to that the commitment from The Document Foundation to six-monthly releases rather than the 'when it's ready' approach of Apache OpenOffice, and you're probably getting more from LibreOffice, now and in the future.

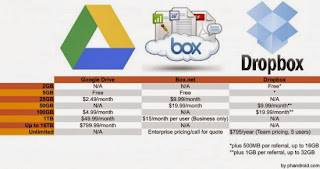
How to use Google Drive?


TECH POP-UPS

In order to get started with Google Drive, you need to have Google account. Create one if you don't have one already - it's pretty simple and quick.

Once that's done, head over to "drive.google.com" and login with your Google account. You will get 15 GB of space by default. Upon logging in , you'll land on the "My Drive " page, this is the place that has all the files and folders that you create/upload using Google Drive. You can use the options on the left hand side to switch to files or folders shared with you, or the ones that you recently viewed/edited, or those that you've starred for quick access (alongside some other options for sorting the files/folders).

There's  a red button on the left side, labelled "create". It can help you create a new folder, document, presentation, spreadsheet, form or drawing in your Google Drive. Right next to it is an "Upload" button which will allow you to upload any type of file from a computer, and it will be saved in your Google Drive.
Once you've created a new file or uploaded one from your computer, you can choose to share it. If you're in the Drive, right click the file, navigate to Share, and then click "share" on the pop-up menu that opens. If you are in the document., click the blue "Share" button on the top-right. You have a few options now.

There's a link to share the item, but you'll have to decide for whom this link will work. Under "who has access" you can add more collaborator (people who can access the file apart from yourself. Enter the emails address (es) of the collaborator (s) in the "invite people" field, and choose whether that person can only view the file, or has the right to edit it as well. You can always come back to change these sharing settings, and add or remove collaborators.

Connect Drive to Your Computer


TECH POP-UPS


You can also install the Google Drive application on your computer. Click 'Connect Drive to your Desktop' on the Google Drive folder will be created on your hard drive and the files and folders in your Google Drive will be accessible from the comfort of your desktop. You can even upload files directly to your Drive by simply copying them into the Google Drive folder. Plus, if you have the Google Drive app installed on your smartphone or tablet, you can access everything on the go as well. 

To share a file from the Google Drive folder on your PC, right click it, and under Google Drive, click 'Share'. The familiar 'share' popup will open, not in a web browser, but as a window , in which you can adjust the sharing settings for selected file explained above. You can also conveniently attach anything in your Google Drive to an email in Gmail, it's right next to the attach a file option in compose. If you're familiar with Dropbox, you'll get used to Google Drive in no time, as it's pretty similar to how Dropbox works.


Hide your important partition/drive from others

TECH POP-UPS

OH! MY GOD! WHO FORMATTED MY DRIVE E!!!


Friends I had the same words while I saw my important data drive formatted.I believe everyone has young lovely brothers or sisters in homes  who are only concerned with games on PC . Sometimes they show their innocent mastery in operating computer  by deleting your important data as well.